In a past article, I tried to come up with an intuitive way of representing the beam width (or “directivity” – if you’re a geek) of the BeoLab 90. I realised after posting, that there is another way to do this which is used in loudspeaker reviews in some magazines (mostly because it’s the way directivity is plotted by MLSSA). So, I’ve taken the same data as before, and re-plotted it using a “waterfall” function in Matlab. It’s just a different way of looking at the same information – but it might be helpful.
If you’re curious about the details regarding the data itself, this is described here.
Figure 1: BeoLab 90 directivity vs. frequency as a “normal” three-way loudspeaker with the Beam Control disabled. (Note that this is not possible in a production model.)
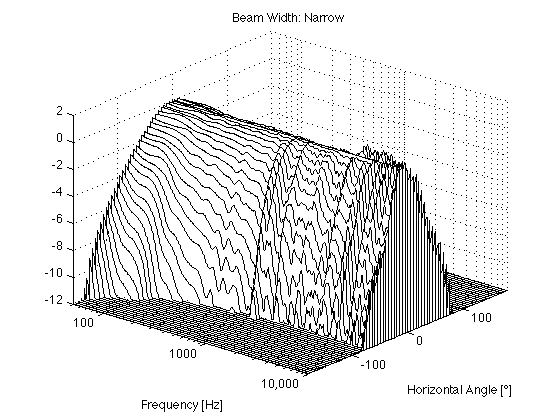
Figure 2: Directivity vs. frequency of BeoLab 90 in Narrow mode
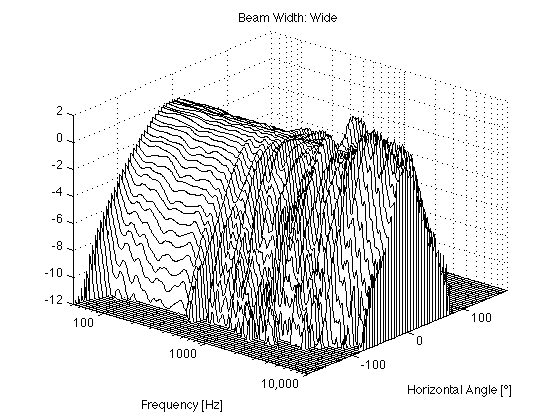
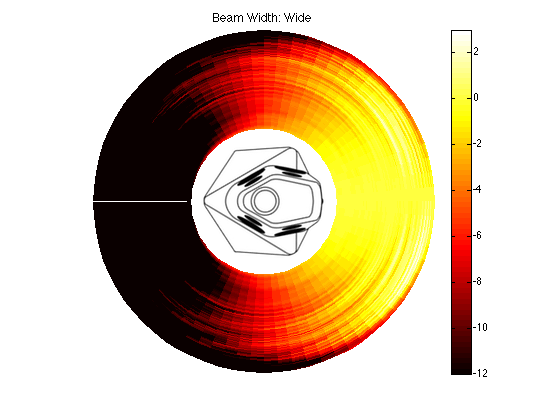
Figure 3: Directivity vs. frequency of BeoLab 90 in Wide mode. Compare this to the BeoLab 5 plot, below. As can be seen here, the low frequency directivity (or beam width) is controlled to be the same as the mid and high frequency bands.
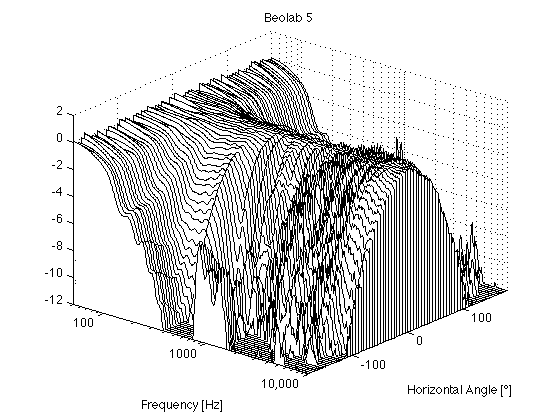
Figure 4: BeoLab 5 directivity vs. frequency. As can be seen here, the Acoustic Lens ensures a constant directivity (meaning the same beam width at all frequencies) in the high end. However, the low frequency band is omnidirectional.
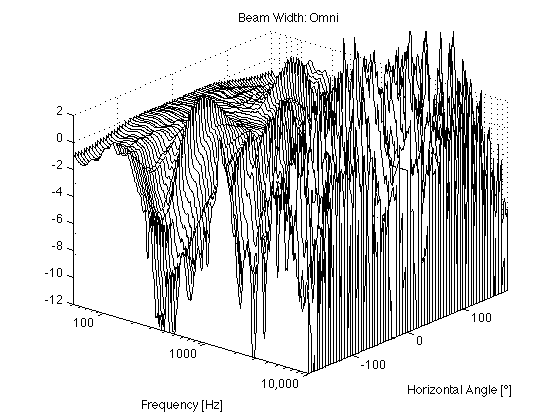
Figure 5: Directivity vs. frequency of BeoLab 90 in Omni mode
I’ve been writing and presenting a lot of information over the past couple of months about the general topic of loudspeaker directivity or “Beam Width” as we call it in the BeoLab 90. One thing that I’ve noticed is that, every time I have to do this in person, I have to explain how to read our directivity plots. This has made me realise that these are not necessarily intuitive to someone that doesn’t look at these kinds of plots (or topographic maps) every day. So, I’ve been working on finding different ways to show the same data. This posting is a first attempt – there will probably be others in the future…
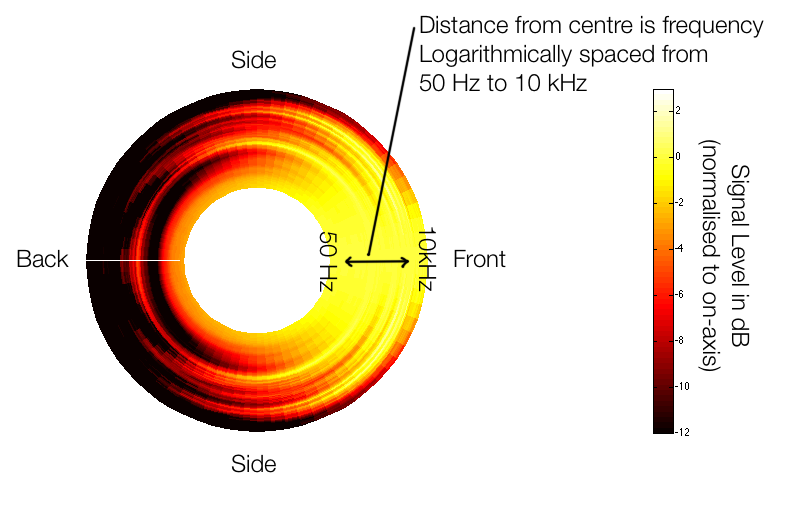
Figure 1: A graphical guide on how to read the circular directivity plots below.
Figure 1, above, shows the idea. We have a loudspeaker, pointing to the right of the screen (towards the word “front”). We measure the magnitude response (more commonly called the “frequency response”) of the loudspeaker on-axis, directly in front of it. Then we rotate the angle of the listening position around the loudspeaker, towards the side. As we do, we measure how much the level changes (usually it gets quieter, but sometimes, at some frequencies and some angles, it gets louder) as a function of angle and frequency. As the angle to the listening position increases, some frequencies will get quiet very quickly, some will not get quiet at all – even when we reach the back of the loudspeaker.
The plot above shows one way to look at this. The inner rings are the low frequencies (in the case of the plots on this webpage, the inner-most ring is 50 Hz) and the further outwards you go, the higher in frequency. The distance between the rings is logarithmic (in other words, by octave) so it makes more sense musically.
If you’re used to looking at the contour plots that I typically show on this site, then take a look at Figure 2 which shows exactly the same data. In this case, it’s plotted as a contour plot (like a topographic map) showing the -3 dB, -6 dB, -9 dB, and -12 dB contours relative to the on-axis response.
BeoLab 90: Beam Width Control: Off
Figures 2 and 3 show the directivity of the BeoLab 90 if you were to disable the Beam Width Control function entirely and just use the front woofer, midrange and tweeter by themselves (and therefore turn off the 15 other loudspeaker drivers in the system. It’s important to note that this is not possible in a production model loudspeaker – we did it as part of the initial measurements of the loudspeaker during the development process.
Figure 2: BeoLab 90 directivity vs. frequency as a “normal” three-way loudspeaker with the Beam Control disabled. (Note that this is not possible in a production model.)
Figure 3: BeoLab 90 directivity vs. frequency as a “normal” three-way loudspeaker with the Beam Control disabled. (Note that this is not possible in a production model.)
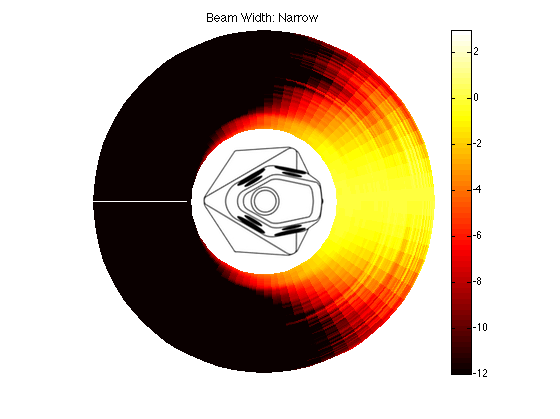
BeoLab 90: Narrow Beam
As I’ve discussed in other postings, our goal with BeoLab 90’s directivity was two-fold: The first was to have a constant directivity – meaning that it should be the same at all frequencies. The second was that the directivity should be narrow in order to reduce the influence of sidewall reflections. Of course, it should not be too narrow – you don’t want a loudspeaker that you can hear in your left ear, but not your right or “headphones at a distance” as I read on one website.
So, we played around with different target directivity functions during the development process, trying to find a beam width that was not too wide and not too narrow. Figures 4 and 5 aren’t drawings of the actual target for BeoLab 90 – but they’re illustrative of the concept.
Figure 4: An example of a possible target for the Directivity vs. frequency of a loudspeaker with a narrow beam width and constant directivity.
Figure 5: An example of a possible target for the Directivity vs. frequency of a loudspeaker with a narrow beam width and constant directivity.
The actual directivity of the narrow beam width in BeoLab 90 is plotted in Figures 6 and 7.
Figure 6: Directivity vs. frequency of BeoLab 90 in Narrow mode
Figure 7: Directivity vs. frequency of BeoLab 90 in Narrow mode
It might also be interesting to compare this to one of BeoLab 90’s competitors from another manufacturer, shown in Figure 8.
Figure 8: Directivity vs. frequency of a competitor’s loudspeaker. This should be compared with the BeoLab 90 ‘s “Narrow” plot
BeoLab 90: Wide Beam
Again, we can look at a candidate for a target (but not the target) for the wide beam mode. This is shown in Figures 8 and 9.
Figure 9: An example of a possible target for the Directivity vs. frequency of a loudspeaker with a wide beam width and constant directivity.
Figure 10: An example of a possible target for the Directivity vs. frequency of a loudspeaker with a wide beam width and constant directivity.
The actual directivity of the wide beam is shown in Figures 10 and 11.
Figure 11: Directivity vs. frequency of BeoLab 90 in Wide mode. Compare this to the BeoLab 5 plot.
Figure 12: Directivity vs. frequency of BeoLab 90 in Wide mode. Compare this to the BeoLab 5 plot.
In addition, it might be interesting to compare those plots to the BeoLab 5 directivity, which had similar targets of a constant and wide directivity.
Figure 13: BeoLab 5 directivity vs. frequency.
Figure 14: BeoLab 5 directivity vs. frequency.
BeoLab 90: Omni Beam
The directivity of BeoLab 90’s Omni mode is shown below in Figures 15 and 16. The lobing caused by the distances between the tweeters is visible in the contour plot, however, as you can see in Figure 16, there is certainly energy being directed in all directions across the entire frequency spectrum. However, the high-frequency lobing, in addition to the beaming in the lower midrange area would indicate that this mode is not appropriate for critical listening…
Figure 15: Directivity vs. frequency of BeoLab 90 in Omni mode
Figure 16: Directivity vs. frequency of BeoLab 90 in Omni mode
Some details
The plots above were done in the horizontal plane with a smoothing of 1/12 octave (by semitone).
The measurements on the loudspeakers were done in 73 increments of 5º from -180º to 180º (in other words, we’re actually measuring both sides of the loudspeaker – we don’t just measure one side and assume the directivity is symmetrical.
Warning: In this page, I use a bunch of equations that might look very unfamiliar. These are called “s-domain expressions”, used in Laplace analysis. If these do not make any sense, don’t worry – it’s not really important that they do – so you can just skip over any math that looks ugly without guilt or concern. The reasons I used it here were twofold: firstly, these are taken from the equations in Bækgaard’s paper (mentioned below), and secondly, it’s the easiest way to show that something is missing (the “MissingPortion” in the intuitive equations below) in a two-way loudspeaker with one type of crossover.
When you build a two-way loudspeaker (one with a tweeter and a woofer), you have to divide the energy in the audio signal before sending it to the two drivers using a circuit called a crossover. This filters the signal sent to a tweeter using a high-pass filter (which only allows the high frequencies to pass through it) and the signal sent to the woofer using a low-pass filter (which allows the low frequencies to pass). The result is a signal that crosses over from the woofer to the tweeter as the frequency increases – hence the name. However, this is not necessarily the end of the solution, since high-pass and low-pass filters have some characteristics that we need to worry about.
One of those issues is that of the phase response of the filters. Although there are many different types of high-pass and low-pass filters, let’s take a simple example of the filters used in a second-order Butterworth two-way crossover – a very typical choice for passive loudspeaker designers.
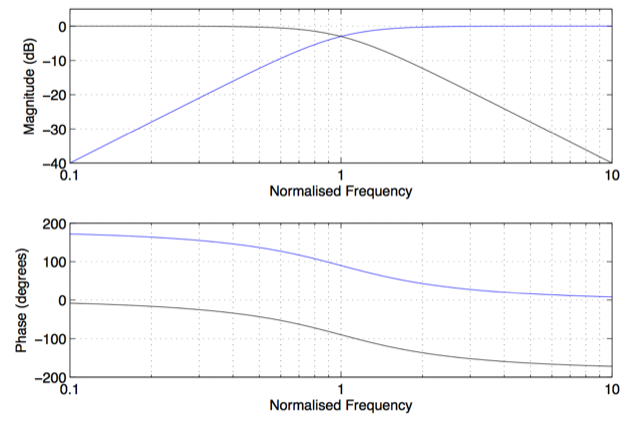
In a typical (second-order Butterworth) two-way crossover, the two bands are 180° out of phase as can be seen in the phase responses calculated using Equations 1 and 2 and plotted in Figure 1.
Figure 1: The Low Pass (black) and High Pass (blue) components of a two-way loudspeaker with a 2nd-order Butterworth crossover network (assuming that both drivers had perfectly flat magnitude responses). Notice that the phase responses are 180º apart at all frequencies.
This phase difference isn’t a big problem at frequencies that are far away from the crossover frequency (where the two components have the same magnitude) because the quieter one isn’t loud enough to cancel the louder one very much. However, the closer you get to the crossover frequency, the more their magnitudes are alike, and so the more they cancel each other. In fact, at the crossover frequency itself, their magnitudes are identical, and, because they are 180° apart in phase, their sum is completely cancelled, resulting in no output at all. (Keep in mind here that, for the purposes of this posting, I’m living in a perfect world where loudspeaker drivers are perfectly linear, there are no time-of-arrival differences between the two drivers at the listening position, and things like diffraction and reflections do not exist…) The total result would therefore look like the responses shown in Figure 2.
Figure 2: The total result of adding the two components in Figure 1, if the polarity of one of the two is not inverted.
To avoid complete cancellation at the crossover frequency where the two signals have identical magnitude, the polarity of the upper frequency band is typically inverted. (This is expressed as the negative sign at the beginning of the right-hand side of Equation 3). However, this solution results in a total sum that has a “bump” in its magnitude response as well as an allpass characteristic (meaning that the phase response of the total output is not a straight line).
Figure 3: The total result of adding the two components in Figure 1, if the polarity of one of the two (in this case, the high pass component).
At the listening position, on-axis to the loudspeaker, in this perfect world, these two frequency responses for the low frequency and high frequency sections (expressed in Equations 1 and 2) are combined using Equation 3.
In May 1977, Erik Bækgaard (pronounced something like BECK-gore), a manager of electronic engineering at B&O, published a paper in the Journal of the Audio Engineering Society where he described a solution to this problem associated with second-order Butterworth crossovers. Take a look at that last equation… Since we want the output to equal the input, we want F_Total(s) = 1. Therefore we can calculate what is missing from the s-plane equation to make that happen.
In other words, what we want is:
Bækgaard’s solution to this problem was to insert that component missing in Equation 5.
The frequency response of that resulting “MissingPortion” is a first-order bandpass filter with a phase response that is exactly between the phase responses of the high pass and low pass components, as can be seen in Figure 4, below. By adding that missing link to the system, the phase response of the entire system is corrected, so Bækgaard called the additional loudspeaker driver a “phase link” driver. So now, if we add the high pass, low pass and phase link components, we get the following:
… which means that the output of the system equals the input – exactly what we wanted!
The Low Pass (black), High Pass (blue), and Phase Link (red) components of a Uni-Phase loudspeaker.
Physically speaking, the solution to the problem was to add a third section in the crossover and an extra loudspeaker driver to fill in the missing phase component, linking the upper and lower frequency sections and avoiding the necessity for polarity inversion. This corrected the phase response of the entire system, eliminated the all pass characteristic and flattened the on-axis magnitude response, as can be seen in Figure 5.
The result was an entire range of loudspeakers, dubbed the “Uni-Phase” series, that was produced from 1976 to 1987. As is shown in Bækgaard’s paper, his system also improved the loudspeakers’ responses in the time domain, not only on-axis, but also off-axis in the vertical plane.
Figure 5: The total result if the three components shown in Figure 4 are added. Notice that the bump in the magnitude response from Figure 3 disappears, and the phase response becomes flat.
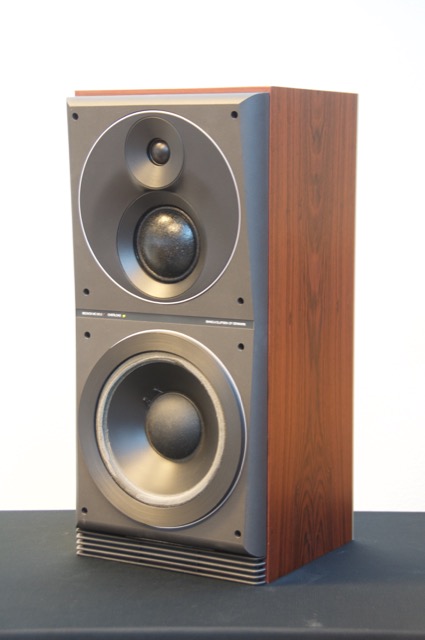
Figure 6, below, shows an example of one of the Uni-Phase loudspeakers. Without knowing what’s going on, it looks like a typical three-way loudspeaker with a woofer, midrange and tweeter. However, this is not the case. The woofer and the tweeter form a two-way loudspeaker and the middle driver is used as the Phase Link. So, instead of having two crossover frequencies, this loudspeaker has only one – and the peak in the bandpass response of the middle driver is at the same frequency as the crossover between the other two drivers.
Figure 6: BeoVox 120.2 (1983-1988) one of the many “Uni-Phase” loudspeakers with a woofer, tweeter and “phase link” driver.
Post-script: Of course, as I mentioned above, everything that I’ve said in this posting makes a lot of assumptions, not only about loudspeaker drivers, but cabinet effects and room acoustics. However, in order to keep things as simple as possible, it’s easier to isolate the issues described above as being the only problem with crossovers and loudspeakers. Sadly, this is not true…
“So how did the BeoLab 90 make us feel? When we closed our eyes in Bang & Olufsen’s special listening room, the pair of master reference speakers (#2 and #3 ever made)—along with the room—seemed to vanish the instant a song played. We weren’t listening to sound emanating from two specific points; instead, the Weeknd was singing his heart out right in front of us. Benny Goodman’s band performed an intimate set, and you could picture where each musician was sitting. The BeoLab 90’s ability to create such a lifelike three-dimensional sound stage is unparalleled when you’re sitting in the sweet spot. It certainly brings up the question of whether a speaker can be “too” good for the music—some now-classic albums weren’t necessarily well-recorded and mastered (think of when the Rolling Stones turned the basement of a rented French mansion into a makeshift studio slash drug den). But when all the variables align perfectly, the music engulfs listeners entirely and hits the guts. The result of such incredible technology and engineering happens to be a very visceral human experience.”
“Die Abbildung war phänomenal, jedes Instrument der gewählten Musik nahm ganz selbstverständlich den für sich bestimmten Platz im Raum ein, jedes Element war von Anfang bis Ende verfolg- und erlebbar. Aber nicht nur die Ortung verblüffte, auch die Detailgenauigkeit, mit der selbst kleinste Feinheiten bis zum erkälteten Backgroundsänger aufgedeckt wurde, sucht ihresgleichen.”
– modernhifi.de
“Vi kan bevidne, at effekten er besnærende. Højttalerne spiller sammen med lytterummet på en måde, vi ikke har oplevet før. Personligt har jeg aldrig hørt et mere holografisk realistisk lydbillede, hverken i eller uden for sweet spot. BeoLab 90 er også en fuldblods, fullrange-højttaler, der ikke overlader noget til tilfældighederne.”
– lydogbillede.dk
“I found that the size of the soundstage was consistently proportional to the size of the ensemble and the recording. I found that the bass was very well extended, taut, and satisfying. Most of all, I was impressed by the prototypes’ reproduction of detail throughout the audio band, and the uniformity of that quality across the soundstage.”
– Kalman Rubinson, Stereophile magazine (print version, October, 2015)
“Wohl noch nie haben Lautsprecher die musikali schen Akteure so scharf ins Wohnzimmer projiziert. Ganz gleich, ob grosse Orchester oder kleine Jazz-Formationen – jedes ein zelne Instrument hat seinen exakten Platz im virtuellen Raum, der auch seine Tiefen dimension verblüffend genau zu erkennen gibt: Der Hörer kann zum Beispiel fast in Zentimetern abzählen, wie weit das Schlag zeug hinter dem Kontrabass placiert ist. Dass der Beolab 90 auch für schwärzeste BassTiefe, überbordende Dynamik und feinen, luftigen Obertonglanz steht, müssen TestHörer der Vollständigkeit halber natür lich ebenfalls zu Protokoll geben, aber das eigentlich Spektakuläre des Lautsprechers ist tatsächlich seine überragende räumliche Abbildung.”
– NZZ am Sonntag 18. Oktober 2015