#2 in a series of articles about the technology behind Bang & Olufsen loudspeakers
Part 1: The very basics
Let’s build a loudspeaker with a relatively decent frequency range. Actually, I should be more specific – I mean not only that it can play a wide range of frequencies, but it can do so adequately loudly to be useful. Chances are that you’ll want it to play down to something around 100 Hz (which is actually not that low… It’s only about an octave and a half below concert C – also known as Middle C to pianists) and up to about 15 000 Hz (which is probably still audible, depending on how old you are, how many hours you have spend clubbing, how loudly your iThingy is usually playing, and whether or not you use ear plugs when you ought to…).
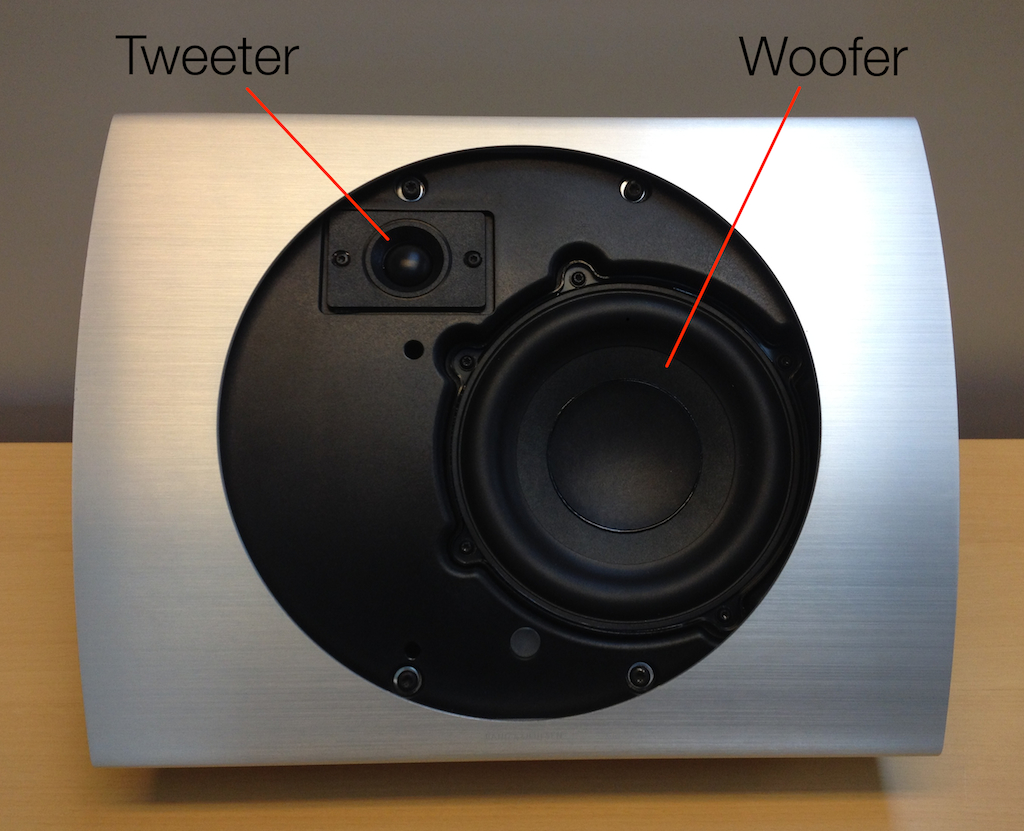
In order to do this, you’ll probably have to use at least two loudspeaker drivers – a woofer for the low frequencies (say, below about 2000 – 3000 Hz) and a tweeter for the high frequencies. The woofer is either big in diameter (say, about 12 to 40 cm) , or it can move very far in and out, or both. The tweeter is much smaller in diameter (on the order of 20 mm or so in diameter), and doesn’t need to move in and out as much. For the purposes of this posting, let’s say that that’s enough (which is not entirely infeasible – there are many loudspeakers in the world that are based on one woofer and one tweeter. Some of them are actually good!) The reason you need a bigger loudspeaker driver for the low frequencies is because, the lower you go in frequency, the more air molecules you need to move. Unfortunately, for every time the frequency is halved (i.e. you go down one octave), you need to quadruple the volume of air that you have to move in order to get the same sound pressure level. So, when it comes to bass, physics is your enemy.
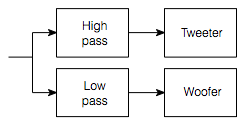
Okay, so we have a woofer and a tweeter, and each of them has to get a different portion of the audio signal. This means that we have to divide the signal using something called a “filter” which, in its most basic form, lets some frequencies through unimpeded and makes other frequencies quieter. A “high pass filter” will let high frequencies through and make lower frequencies quieter. A “low pass filter” will do the opposite. So, we put a low pass filter in the path of the signal going to the woofer, and a high pass filter in the path of the signal going to the tweeter. The combination of those two filters are what is called the crossover, since it is the circuit that allows the audio signal to cross over from the woofer to the tweeter and back again, as is necessary.

Part 2: Amplification
Unfortunately, loudspeaker drivers are very inefficient. Typically, you should expect about 1% of the electrical power you send into a loudspeaker driver to be available as acoustical power. The other 99% is lost as heat. This means that if you want your loudspeakers to play loudly, then you’re going to have to feed them with a lot of power (because you are throwing away 99% of what you put in). Consequently, you need something called a “power amplifier” connected to the loudspeaker drivers. This is a device that has a small audio signal coming into it (typically a change in voltage with almost no current) – it makes the signal much louder, typically by increasing the voltage by some multiplication factor (say, around 20 times) and making current available as is needed. (And since voltage multiplied by current is power, we get a power amplifier.)
Part 3: Signal flow
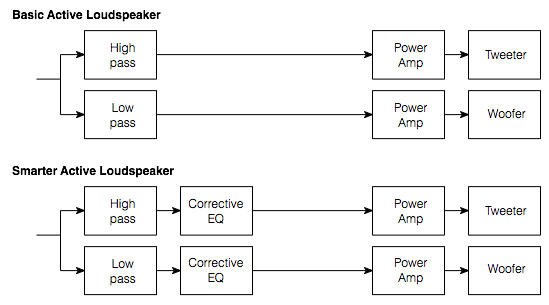
Now we start getting into the interesting stuff. At this point in the process of designing our loudspeaker, we have to make a choice. Either
- we put one power amplifier at the start of the chain, and filter its output before sending the signals on to the woofer and tweeter (a passive loudspeaker design), or
- we filter the signals first and then use a separate power amplifier for each driver (an active loudspeaker design) .
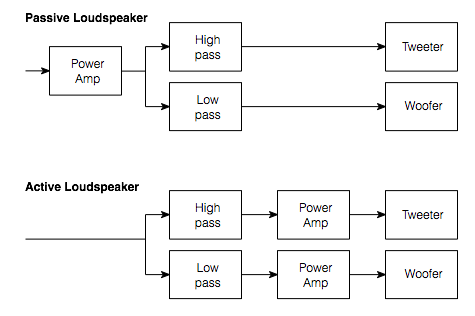
To be honest, if the diagram above was all there was to it, there wouldn’t really be much point in making an active loudspeaker. If all we did was to make relatively simple low pass and high pass filters, we basically could do the same filtering to the audio signal either way. The passive filtering circuit is big, and the active filtering circuit is small (basically because the passive components have to be able to dissipate more power) but the power amps in the active design take up space, so there’s not much gained there. So what’s the point? Some people will make the claim that the amplifier has “better control” of the loudspeaker driver if there is no circuitry (like a low-pass or a high-pass filter) between them. However, to be honest, even if that were true enough to make an audible difference in things (I won’t say whether it is or it isn’t – since this is a debate best left out of this posting), it certainly wouldn’t be the first item on your list-of-things-to-worry-about. So, what IS the point?

Well, in order to get the point, we need to know a little more about how a driver behaves when you put it in an enclosure.
Part 4: Some basic acoustics
Take a really big sealed box and cut a hole in one side that has the same diameter as a woofer. Put the woofer in the hole so that the woofer is now in a “sealed enclosure”. If you do a frequency response measurement of the output of the woofer (on-axis, meaning “directly in front of the woofer” you’ll probably see that, as you go lower and lower in frequency, you’ll reach a point where the output of the woofer drops as you go lower. In fact, it has a natural high-pass characteristic. The reasons for this are beyond the scope of this discussion – you’ll either have to trust me on this one, or go read more stuff. If you thump the woofer with your thumb when it’s in this box, it will sound a little like a kick drum – it’ll go “thump”.
If you make the box much, much smaller in volume, you’ll see that the natural frequency response of the system changes. This is because the air in the box acts as a spring behind the woofer, and as the box gets smaller, the spring gets stiffer. The result of this in the frequency response is that you get a peak at some frequency. If you thump the woofer in this smaller box, you’ll now hear it ringing (at the frequency where you see that peak in the response) – now it goes ‘boommmmmm’, humming at one pitch – a bit like a big bell. The smaller you make the box, the higher in frequency the pitch go, and the longer it will ring. In addition, you’ll notice that there is a lot less low-frequency output below the ringing frequency.
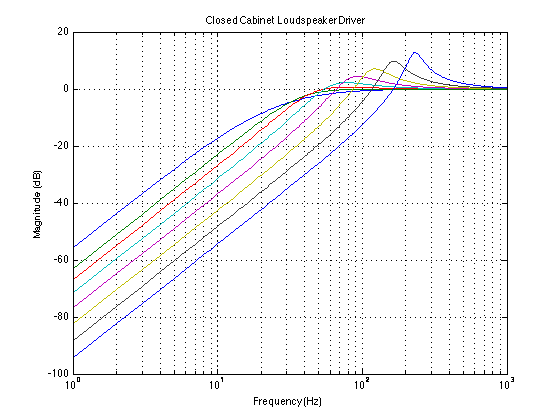
If you take a look at the plot below, you can see examples of this. The curves show the response of the same woofer in different sized sealed enclosures. The flattest curve is the biggest box – notice that it doesn’t have a peak poking up, and it has about 40 dB (this is a LOT) more output at the very bottom end (okay, okay, it’s 1 Hz, but the absolute values aren’t important here – it’s the difference in the curves that counts). The curve with the biggest peak is the result of putting a woofer in a box that’s just too small for it. (If you’d like to know the details behind this plot, read this.)
Part 5: Bringing it all together
Let’s start this section by admitting a simple fact: if the only thing criterion you use to judge a loudspeaker with is the volume of the enclosure behind the loudspeaker drivers, Bang & Olufsen loudspeakers are too small (yes – even the BeoLab 5). Take any of our loudspeakers, and you have an example of a woofer that is put in an enclosure that has too little volume for it to behave well naturally. In other words, when we look at the natural response of any of our loudspeakers, they look more like the “bad” curve than the “good” curve in the plots above. This means that we have to encourage it to behave a little better. This means, in the simplest case (still looking at the curves above) that we have to boost the bass and remove the peak in the natural response of the system.
We do this by making a filter (in addition to the low pass filter) that overcomes the natural behaviour of the woofer in its enclosure. If we want more bass out of the system, we turn up the bass. If we want to remove a 7.3 dB peak at 143.5 Hz that has a Q of 4.6, then we put in a dip of 7.3 dB at 143.5 Hz and a Q of 4.6 (If those terms don’t make any sense, don’t worry – all that’s really important to know is that we can “undo” the effects of a peak in the natural response of the system by putting in a reciprocal dip in the signal that we feed it.)
In theory, this is possible using filters that happen after the amplifier – but it is certainly MUCH MUCH easier to make those filters (even without going to digital processing) using small resistors and capacitors and op amps before you get to the amplifiers. For example, you can see in the photo above, the SMD resistor and capacitor (which can be used in a modern active crossover) are much smaller than the power resistor and the inductor (which we would still have to use in a passive crossover).
So, even if you’re not doing anything other than trying to customise the sound of a loudspeaker using some filters (also known as equalisers) – as we do in almost all of our loudspeakers – it is smarter to make an active loudspeaker than a passive one.

Part 6: The beneficial side effects
So, in order to compensate for the acoustical effects of putting a woofer in too small a package, we have to make an active loudspeaker design instead of a passive one.
But this then raises the question, now that we have an active loudspeaker, what else can we do? The answer is lots of stuff!
Since we can apply filtering independently to each loudspeaker driver we can do some serious customisation of the system. To give just a few simple examples:
- You have a resonance in the woofer at a frequency that is above the crossover. You want to correct the problem in your filtering (because you can hear and/or measure it), but the problem does not exist in the midrange. So, you want to have a filter on the woofer alone – not the woofer and midrange and a passive crossover.
- You want to do some dynamic processing on a driver without affecting the others. (for example, ABL)
- You want to compensate for small differences in loudspeaker driver sensitivity on a production line by doing an automated measurement and a gain offset on a driver-by-driver, loudspeaker-by-loudspeaker basis to ensure that loudspeakers leaving the factory are better matched to the “golden sample”
An active loudspeaker design makes all of these examples MUCH easier (or perhaps even “possible”) to achieve.
Conclusion
All of that being said,
- if your electroacoustical behaviour of every component in your audio chain was “perfect” (whatever that means) AND
- if loudspeakers behaved linearly (i.e. they gave you the same frequency response at all listening levels, and they didn’t change their behaviours when they heat up, and so on and so on) AND
- if you did everything properly (meaning that your cabinets were the right size and shape) AND
- if your production tolerances of every component in the system was +/- 0%.
Then MAYBE a passive loudspeaker design could work just as well as an active design…
David Keener says:
Thanks for explaining the benefits of active loudspeakers and how a speaker in a small cabinet can produce low bass.
Would it be possible to do a few quick calculations to show how much greater a BeoLab speaker cabinet would have to be to have the low bass frequency response would be if bass equalization was not applied?
For example, to have the duplicate the F3 frequency for the BeoLab 3 without having any low bass equalization, the cabinet volume would have to be 5 times greater.
David
geoff says:
Hi David,
The only way to do this would be to run the calculations on a speaker-by-speaker basis, since it’s dependent on the Theile-Small parameters of the specific woofer. However, as I’ll describe in a future posting (to be published about a week and a half from now) we don’t just take off-the-shelf drivers and stick them in a box that’s too small. We almost always go back to the driver manufacturer and get things changed (like the compliance or Bl curve) to better suit the fact that we’re using a cabinet that is smaller than recommended for the driver. This means that, for example, if you look at one of our loudspeakers and you THINK that you know the model number of the woofer that you see, and you look up the parameters for that model number, you’ll probably be looking at values that are different from the actual ones of the actual driver in the loudspeaker.
Of course, another way is to show an ACTUAL EQ curve that we apply to one of the drivers in one of our loudspeakers, but that’s not something I’d be allowed to make public. However, I will say that it would not be unusual to see something like a 20 dB boost in the low end of our DSP-based loudspeakers.
Cheers
-geoff
Kristian says:
Great blog, enjoyable to read!
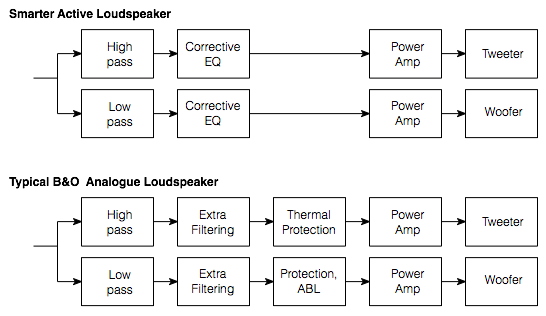
A question, the bottom figure in the last illustration, does it really represent a typical analouge B&O loudspeaker or should it say typical active B&O loudspeaker?
geoff says:
Oops… nice catch… You’re right. I’ll fix it on the weekend (if I remember).
Mvh
– geoff
Stephen Clary says:
Geoff,
Thanks for your interesting blogs. Nice to read a blog with training and real world experience to back up its statements and opinions.
In active speakers how much degradation in signal quality is lost in the analog to digital and then digital back to analog conversions? Is there a minimum bit rate needed? Is it audible?
Thank you, Steve
geoff says:
Hi Steve,
Generally speaking, these days, the DAC is rarely the weakest link in any reasonable audio system, so this is not a concern. A 24-bit DAC is not uncommon. Although the 141 dB that is theoretically possible from 24 bits is not practically possible to achieve in the analogue stages contained in the DAC, there’s still plenty of dynamic range to work with in most cases.
The front-end of the system can be more problematic – particularly the ADC and the analogue stages before it – if the gain of the system is high, as it is with a loudspeaker with a built-in power amplifier. Typically, the weakness in an analogue input stage (including the ADC) appears as an elevated noise floor at the output. In cases where the incoming signal’s level is known, then the input stages can be optimised to get the maximum dynamic range (and therefore the lowest noise floor). However, if the incoming signal’s level is not known, then this is impossible.
For example, the maximum output level of some laptop minijack outputs is only 300 mV RMS, whereas some high-end AV gear can deliver up to 15 V RMS. This is a difference of about 34 dB. So, if you design your input stage to clip with a 15 V input, and then you plug in the laptop and turn up the gain of your device, you’ll increase the noise level of the input stage (ignoring the laptop’s noise floor) by 34 dB to get the same output level.
This is why the BeoLab 90 & 50 give the user the option to change the sensitivity of the analogue input(s) – to ensure that the noise floor is as low as possible for the given source device. However, such an adjustment is not feasible on all devices – for many reasons…
To be honest the weaker links in most digital audio gear these days lies in the algorithms buried in the digital signal processing – typically in the sources and the transmission systems… I worry more about the artefacts in sampling rate converters in music player applications and devices than I do about ADC or DAC specifications…
Hope this helps to alleviate your fears about hardware – and to make you worry more about software… :-)
Cheers
-geoff