#81 in a series of articles about the technology behind Bang & Olufsen loudspeakers
Bertrand Russell once said, “In all affairs it’s a healthy thing now and then to hang a question mark on the things you have long taken for granted.”
This article is a discussion, both philosophical and technical about what a volume control is, and what can be expected of it. This seems like a rather banal topic, but I find it surprising how often I’m required to explain it.
Why am I writing this?
I often get questions from colleagues and customers that sound something like the following:
- Why does my Beovision television’s volume control only go to 90%? Why can’t I go to 100%?
- I set the volume on my TV to 40, so why is it so quiet (or loud)?
The first question comes from people who think that the number on the screen is in percent – but it’s not. The speedometer in your car displays your speed in kilometres per hour (km/h), the tachometer is in revolutions of the engine per minute (RPM) the temperature on your thermostat is in degrees Celsius (ºC), and the display on your Beovision television is on a scale based on decibels (dB). None of these things are in percent (imagine if the speed limit on the highway was 80% of your car’s maximum speed… we’d have more accidents…)
The short reason we use decibels instead of percent is that it means that we can use subtraction instead of division – which is harder to do. The shortcut rule-of-thumb to remember is that, every time you drop by 6 dB on the volume control, you drop by 50% of the output. So, for example, going from Volume step 90 to Volume step 84 is going from 100% to 50%. If I keep going down, then the table of equivalents looks like this:
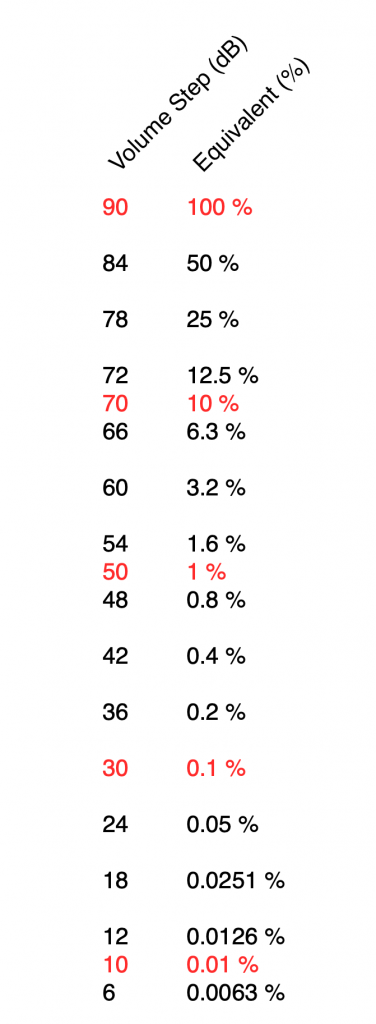
I’ve used two colours there to illustrate two things:
- Every time you drop by 6 volume steps, you cut the percentage in half. For example, 60 is five drops of 6 steps, which is 1/2 of 1/2 of 1/2 of 1/2 of 1/2 of 100%, or 3.2% (notice the five halves there…)
- Every time you drop by 20, you cut the percentage to 1/10. So, Volume Step 50 is 1% of Volume Step 90 because it’s two drops of 20 on the volume control.
If I graph this, showing the percentage equivalent of all 91 volume steps (from 0 to 90) then it looks like this:
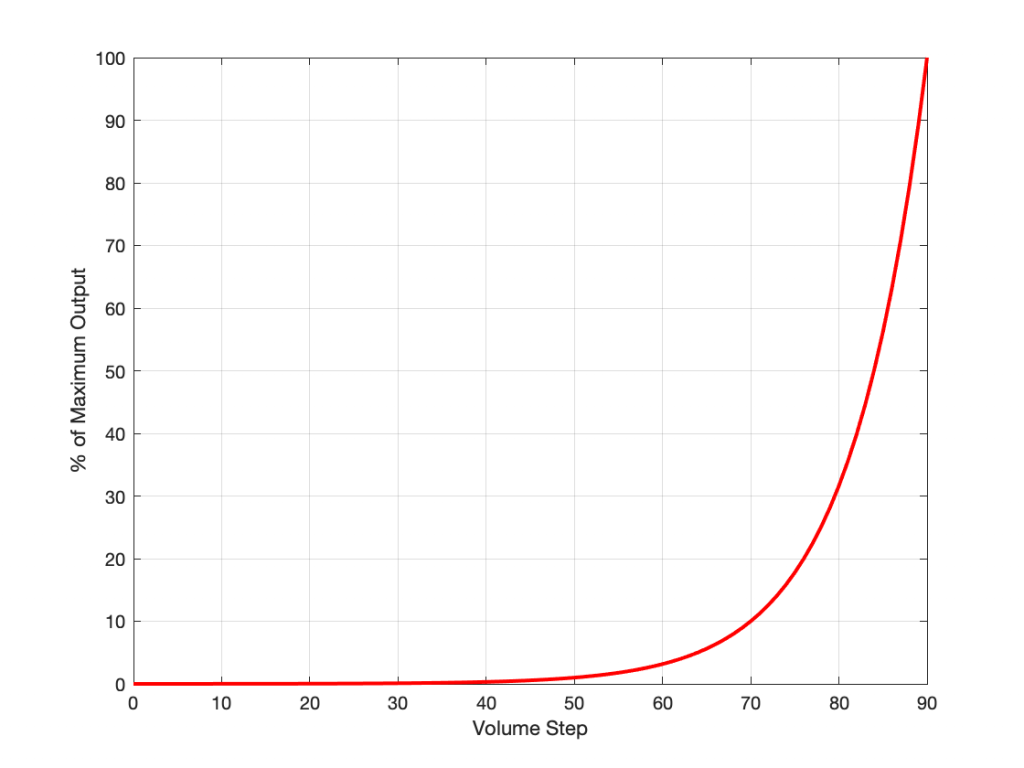
Of course, the problem this plot is that everything from about Volume Step 40 and lower looks like 0% because the plot doesn’t have enough detail. But I can fix that by changing the way the vertical axis is displayed, as shown below.
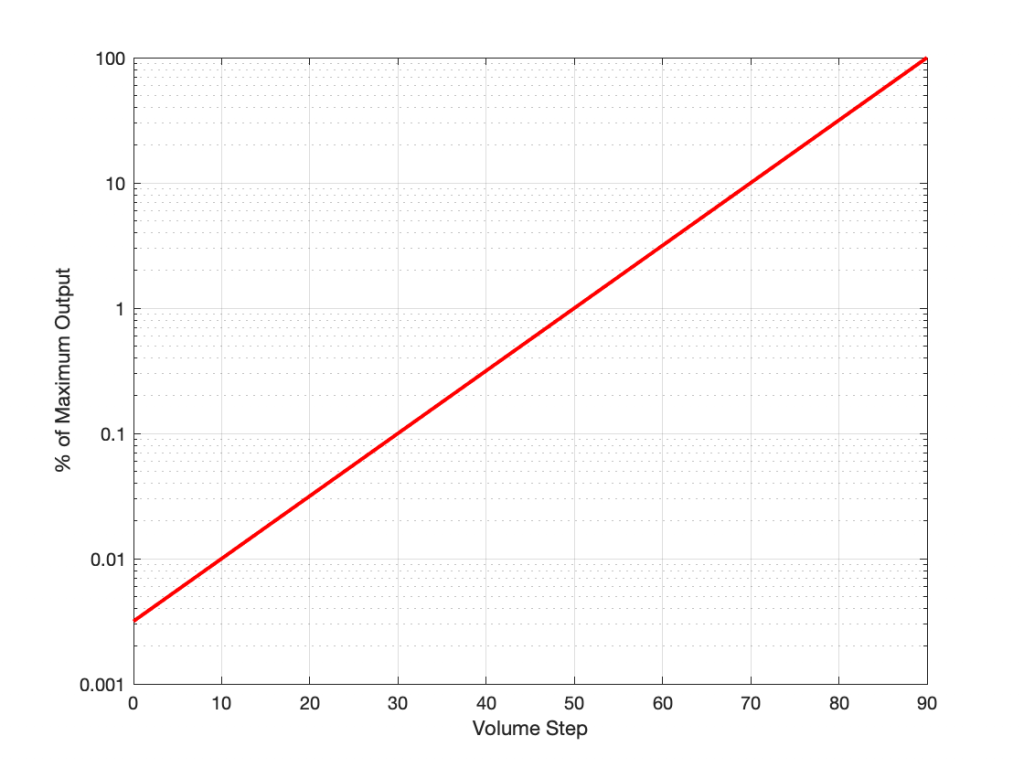
That plot shows exactly the same information. The only difference is that the vertical scale is no longer linearly counting from 0% to 100% in equal steps.
Why do we (and every other audio company) do it this way? The simple reason is that we want to make a volume slider (or knob) where an equal distance (or rotation) corresponds to an equal change in output level. We humans don’t perceive things like change in level in percent – so it doesn’t make sense to use a percent scale.
For the longer explanation, read on…
Basic concepts
We need to start at the very beginning, so here goes:
Volume control and gain
- An audio signal is (at least in a digital audio world) just a long list of numbers for each audio channel.
- The level of the audio signal can be changed by multiplying it by a number (called the gain).
- If you multiply by a value larger than 1, the audio signal gets louder.
- If you multiply by a number between 0 and 1, the audio signal gets quieter.
- If you multiply by zero, you mute the audio signal.
- Therefore, at its simplest core, a volume control implemented in a digital audio system is a multiplication by a gain. You turn up the volume, the gain value increases, and the audio is multiplied by a bigger number producing a bigger result.
That’s the first thing. Now we move on to how we perceive things…
Perception of Level
Speaking very generally, our senses (that we use to perceive the world around us) scale logarithmically instead of linearly. What does this mean? Let’s take an example:
Let’s say that you have $100 in your bank account. If I then told you that you’d won $100, you’d probably be pretty excited about it.
However, if you have $1,000,000 in your bank account, and I told you that you’re won $100, you probably wouldn’t even bother to collect your prize.
This can be seen as strange; the second $100 prize is not less money than the first $100 prize. However, it’s perceived to be very different.
If, instead of being $100, the cash prize were “equal to whatever you have in your bank account” – so the person with $100 gets $100 and the person with $1,000,000 gets $1,000,000, then they would both be equally excited.
The way we perceive audio signals is similar. Let’s say that you are listening to a song by Metallica at some level, and I ask you to turn it down, and you do. Then I ask you to turn it down by the same amount again, and you do. Then I ask you to turn it down by the same amount again, and you do… If I were to measure what just happened to the gain value, what would I find?
Well, let’s say that, the first time, you dropped the gain to 70% of the original level, so (for example) you went from multiplying the audio signal by 1 to multiplying the audio signal by 0.7 (a reduction of 0.3, if we were subtracting, which we’re not). The second time, you would drop by the same amount – which is 70% of that – so from 0.7 to 0.49 (notice that you did not subtract 0.3 to get to 0.4). The third time, you would drop from 0.49 to 0.343. (not subtracting 0.3 from 0.4 to get to 0.1).
In other words, each time you change the volume level by the “same amount”, you’re doing a multiplication in your head (although you don’t know it) – in this example, by 0.7. The important thing to note here is that you are NOT subtracting 0.3 from the gain in each of the above steps – you’re multiplying by 0.7 each time.
What happens if I were to express the above as percentages? Then our volume steps (and some additional ones) would look like this:
100%
70%
49%
34%
24%
17%
12%
8%
Notice that there is a different “distance” between each of those steps if we’re looking at it linearly (if we’re just subtracting adjacent values to find the difference between them). However, each of those steps is a reduction to 70% of the previous value.
This is a case where the numbers (as I’ve expressed them there) don’t match our experience. We hear each reduction in level as the same as the other steps, but they don’t look like they’re the same step size when we write them all down the way I’ve done above. (In other words, the numerical “distance” between 100 and 70 is not the same as the numerical “distance” between 49 and 34, but these steps would sound like the same difference in audio level.)
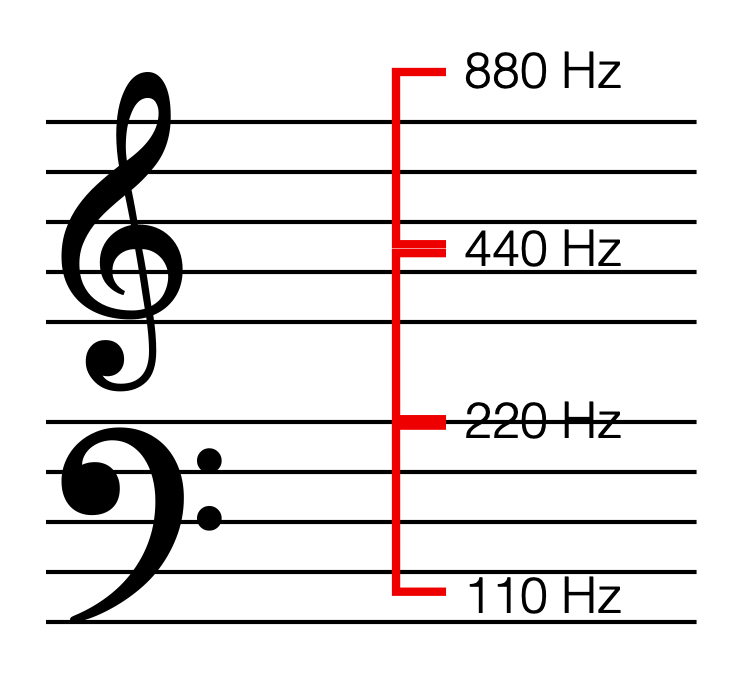
SIDEBAR: This is very similar / identical to the way we hear and express frequency changes. For example, the figure below shows a musical staff. The red brackets on the left show 3 spacings of one octave each; the distance between each of the marked frequencies sound the same to us. However, as you can see by the frequency indications, each of those octaves has a very different “width” in terms of frequency. Seen another way, the distance in Hertz in the octave from 440 Hz to 880 Hz is equal to the distance from 440 Hz all the way down to 0 Hz (both have a width of 440 Hz). However, to us, these sound like very different intervals.
SIDEBAR to the SIDEBAR: This also means that the distance in Hertz covered by the top octave on a piano is larger than the the distance covered by all of the other keys.
SIDEBAR to the SIDEBAR to the SIDEBAR: This also means that changing your sampling rate from 48 kHz to 96 kHz doubles your bandwidth, but only gives you an extra octave. However, this is not an argument against high-resolution audio, since the frequency range of the output is a small part of the list of pro’s and con’s.)
This is why people who deal with audio don’t use percent – ever. Instead, we use an extra bit of math that uses an evil concept called a logarithm to help to make things make more sense.
What is a logarithm?
If I say the following, you should not raise your eyebrows:
2*3 = 6, therefore 6/2 = 3 and 6/3 = 2
In other words, division is just multiplication done backwards. This can be generalised to the following:
if a*b=c, then c/a=b and c/b=a
Logarithms are similar; they’re just exponents done backwards. For example:
102 = 100, therefore Log10(100) = 2
and generally:
AB=C, therefore LogA(C) = B
Why use a logarithm?
The nice thing about logarithms is that they are a convenient way for a mathematician to do addition instead of multiplication.
For example, if I have the following sequence of numbers:
2, 4, 8, 16, 32, 64, and so on…
It’s easy to see that I’m just multiplying by 2 to get the next number.
What if I were to express the number sequence above as a series of exponents? Then it would look like this:
21, 22, 23, 24, 25, 26
Not useful yet…
What if I asked you to multiply two numbers in that sequence? Say, for example, 1024 * 8192. This would take some work (or at least some scrambling, looking for the calculator app on your phone…). However, it helps to know that this is the same as asking you to multiply 210 * 213 – to which the answer is 223. Notice that 23 is merely 10+13. So, I’ve used exponents to convert the problem from multiplication (1024*8192) to addition (210 * 213 = 2(10+13)).
How did I find out that 8192 = 213? By using a logarithm : Log2(8192) = 13.
In the old days, you would have been given a book of logarithmic tables in school, which was a way of looking up the logarithm of 8192. (Actually, those books were in base 10 and not base 2, so you would have found out that Log10(8192) = 3.9013, which would have made this discussion more confusing…) Nowadays, you can use an antique device called a “calculator” – a simulacrum of which is probably on a device you call a “phone” but is rarely used as such.
I will leave it to the reader to figure out why this quality of logarithms (that they convert multiplication into addition) is why slide rules work.
So what?
Let’s go back to the problem: We want to make a volume slider (or knob) where an equal distance (or rotation) corresponds to an equal change in level. Let’s do a simple one that has 10 steps. Coming down from “maximum” (which we’ll say is a gain of 1 or 100%), it could look like these:
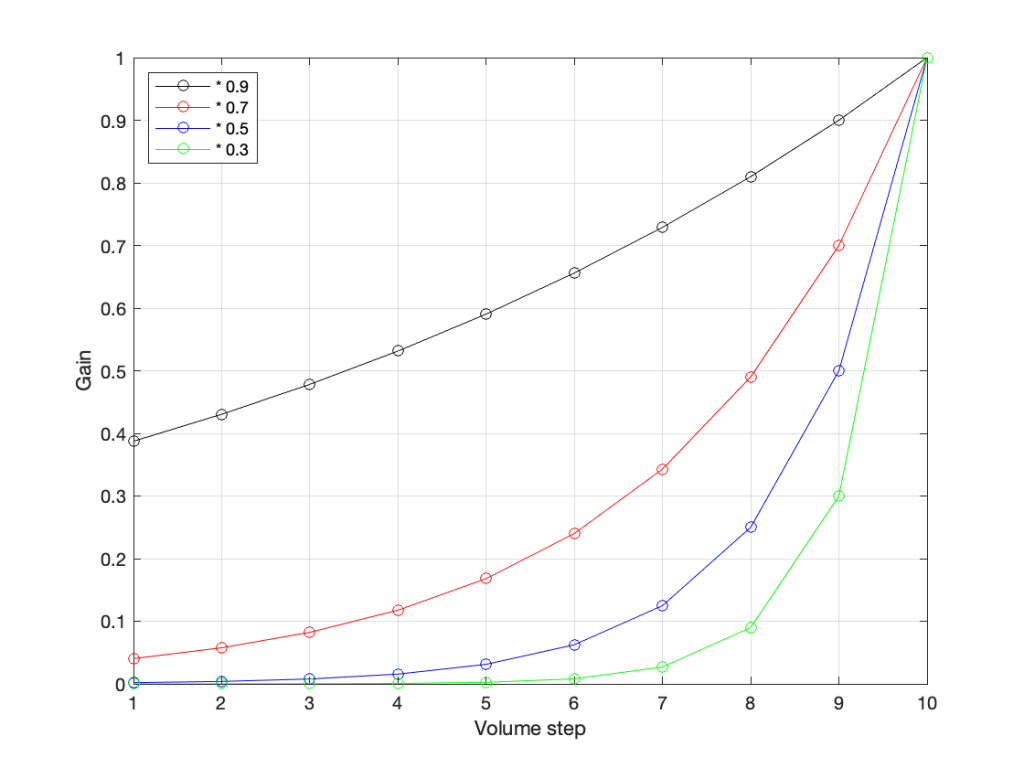
The plot above shows four different options for our volume controller. Starting at the maximum (volume step 10) and working downwards to the left, each one drops by the same perceived amount per step. The Black plot shows a drop of 90% per step, the red plot shows a drop of 70% per step (which matches the list of values I put above), Blue is 50% per step, and green is 30% per step.
As you can see, these lines are curved. As you can also see, as you get lower and lower, they get to the point where it gets harder to see the value (for example, the green curve looks like it has the same gain value for Volume steps 1 through 4).
However, we can view this a different way. If we change the scale of our graph’s Y-Axis to a logarithmic one instead of a linear one, the exact same information will look like this:
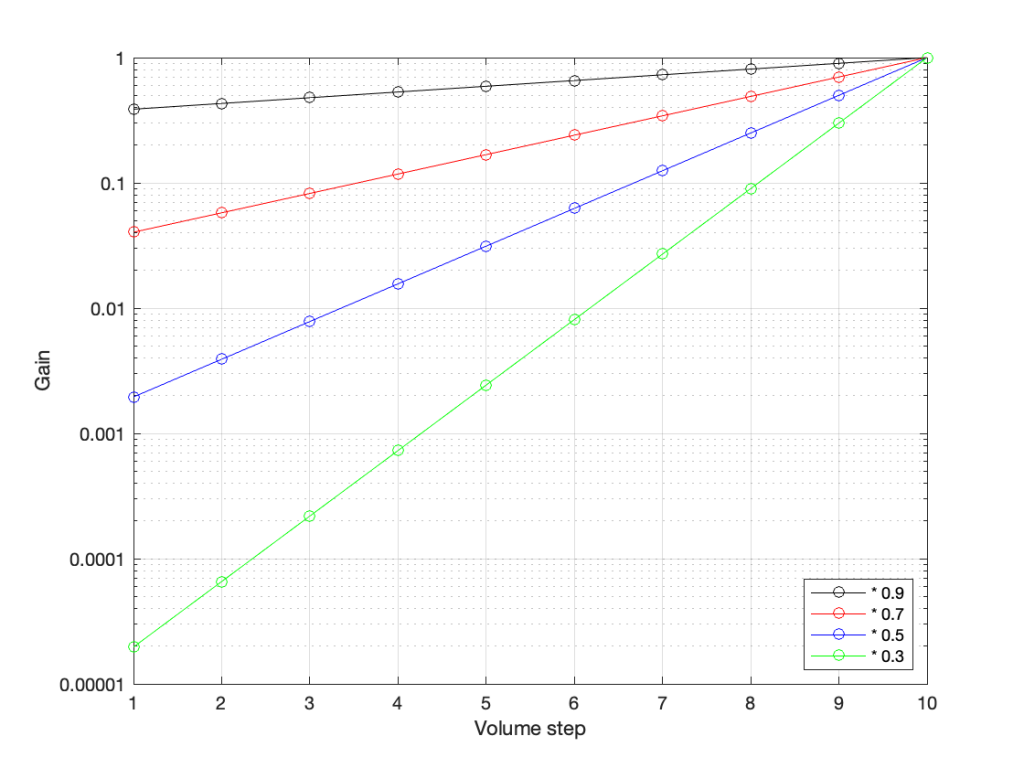
Notice now that the Y-axis has an equal distance upwards every time the gain multiplies by 10 (the same way the music staff had the same distance every time we multiplied the frequency by 2). By doing this, we now see our gain curves as straight lines instead of curved ones. This makes it easy to read the values both when they’re really small and when they’re (comparatively) big (those first 4 steps on the green curve don’t look the same on that plot).
So, one way to view the values for our Volume controller is to calculate the gains, and then plot them on a logarithmic graph. The other way is to build the logarithm into the gain itself, which is what we do. Instead of reading out gain values in percent, we use Bels (named after Alexander Graham Bell). However, since a Bel is a big step, we we use tenths of a Bel or “decibels” instead. (… In the same way that I tell people that my house is 4,000 km, and not 4,000,000 m from my Mom’s house because a metre is too small a division for a big distance. I also buy 0.5 mm pencil leads – not 0.0005 m pencil leads. There are many times when the basic unit of measurement is not the right scale for the thing you’re talking about.)
In order to convert our gain value (say, of 0.7) to decibels, we do the following equation:
20 * Log10(gain) = Gain in dB
So, we would say
20 * Log10(0.7) = -3.01 dB
I won’t explain why we say 20 * the logarithm, since this is (only a little) complicated.
I will explain why it’s small-d and capital-B when you write “dB”. The small-d is the convention for “deci-“, so 1 decimetre is 1 dm. The capital-B is there because the Bel is named after Alexander Graham Bell. This is similar to the reason we capitalize Hz, V, A, and so on…
So, if you know the linear gain value, you can calculate the equivalent in decibels. If I do this for all of the values in the plots above, it will look like this:
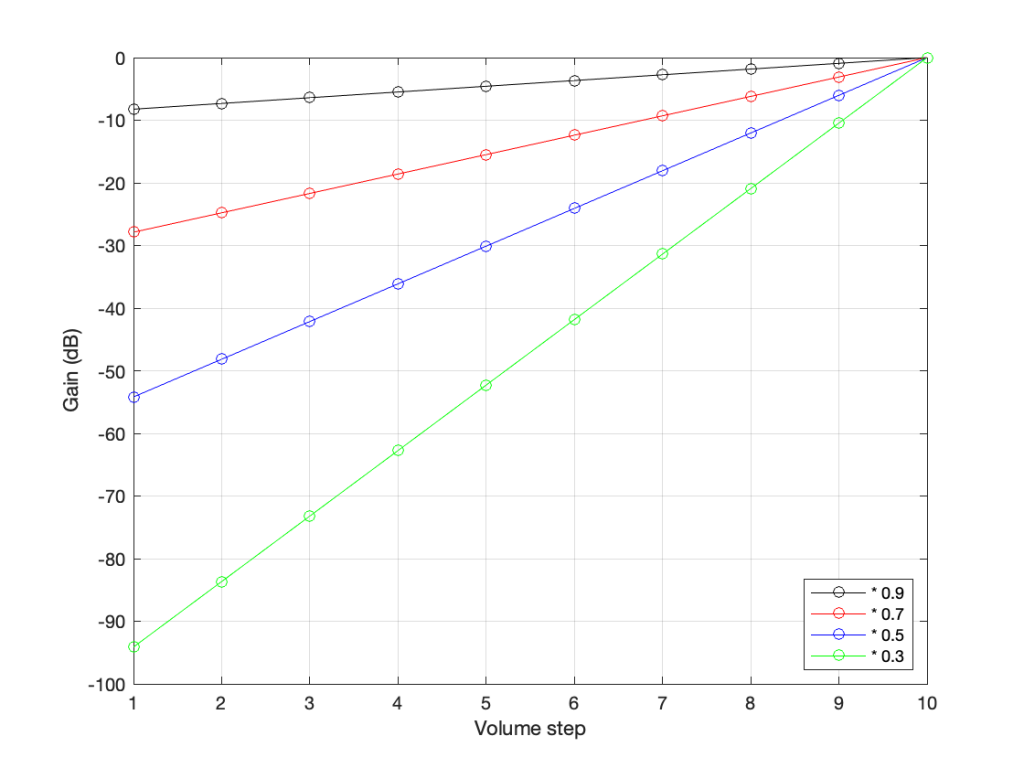
Notice that, on first glance, this looks exactly like the plot in the previous figure (with the logarithmic Y-Axis), however, the Y-Axis on this plot is linear (counting from -100 to 0 in equal distances per step) because the logarithmic scaling is already “built into” the values that we’re plotting.
For example, if we re-do the list of gains above (with a little rounding), it becomes
100% = 0 dB
70% = -3 dB
49% = -6 dB
34% = -9 dB
24% = -12 dB
17% = -15 dB
12% = -18 dB
8% = -21 dB
Notice coming down that list that each time we multiplied the linear gain by 0.7, we just subtracted 3 from the decibel value, because, as we see in the equation above, these mean the same thing.
This means that we can make a volume control – whether it’s a slider or a rotating knob – where the amount that you move or turn it corresponds to the change in level. In other words, if you move the slider by 1 cm or rotate the knob by 10º – NO MATTER WHERE YOU ARE WITHIN THE RANGE – the change is level will be the same as if you made the same movement somewhere else.
This is why Bang & Olufsen devices made since about 1990 (give or take) have a volume control in decibels. In older models, there were 79 steps (0 to 78) or 73 steps (0 to 72), which was expanded to 91 steps (0 to 90) around the year 2000, and expanded again recently to 101 steps (0 to 100). Each step on the volume control corresponds to a 1 dB change in the gain. So, if you change the volume from step 30 to step 40, the change in level will appear to be the same as changing from step 50 to step 60.
Volume Step ≠ Output Level
Up to now, all I’ve said can be condensed into two bullet points:
- Volume control is a change in the gain value that is multiplied by the incoming signal
- We express that gain value in decibels to better match the way we hear changes in level
Notice that I didn’t say anything in those two statements about how loud things actually are… This is because the volume setting has almost nothing to do with the level of the output, which, admittedly, is a very strange thing to say…
For example, get a DVD or Blu-ray player, connect it to a television, set the volume of the TV to something and don’t touch it for the rest of this experiment. Now, put in a DVD copy of any movie that has ONLY dialogue, and listen to how loud it sounds. Then, take out the DVD and put in a CD of Metallica’s Death Magnetic, press play. This will be much, much louder. In fact, if you own a B&O TV, the difference in level between those two things is the same as turning up the volume by 31 steps, which corresponds to 31 dB. Why?
When re-recording engineers mix a movie, they aim to make the dialogue sit around a level of 31 dB below maximum (better known as -31 dB FS or “31 decibels below Full Scale”). This gives them enough “headroom” to get much louder for explosions and gunshots to be exciting.
When a mixing engineer and a mastering engineer work on a pop or rock album, it’s not uncommon for them to make it as loud as possible, aiming for maximum (better known as 0 dB FS).
This means that a movie’s dialogue is much quieter than Metallica or Billie Eilish or whomever is popular when you’re reading this, because Metallica is as loud as the explosions in the movie.
The volume setting is just a value that changes that input level… So, If I listen to music at volume step 42 on a Beovision television, and you watch a movie at volume step 73 on the same Beovision television, it’s possible that we’re both hearing the same sound pressure level in our living rooms, because the music is 31 dB louder than the movie, which is the same amount that I’ve turned down my TV relative to yours (73-42 = 31).
In other words, the Volume Setting is not a predictor of how loud it is. A Volume Setting is a little like the accelerator pedal in your car. You can use the pedal to go faster or slower, but there’s no way of knowing how fast you’re driving if you only know how hard you’re pushing on the pedal.
What about other brands and devices?
This is where things get really random:
- take any device (or computer or audio software)
- play a sine wave (because thats easy to measure)
- measure the change in output level as you change the volume setting
- graph the result
- Repeat everything above for different devices
You’ll see something like this:
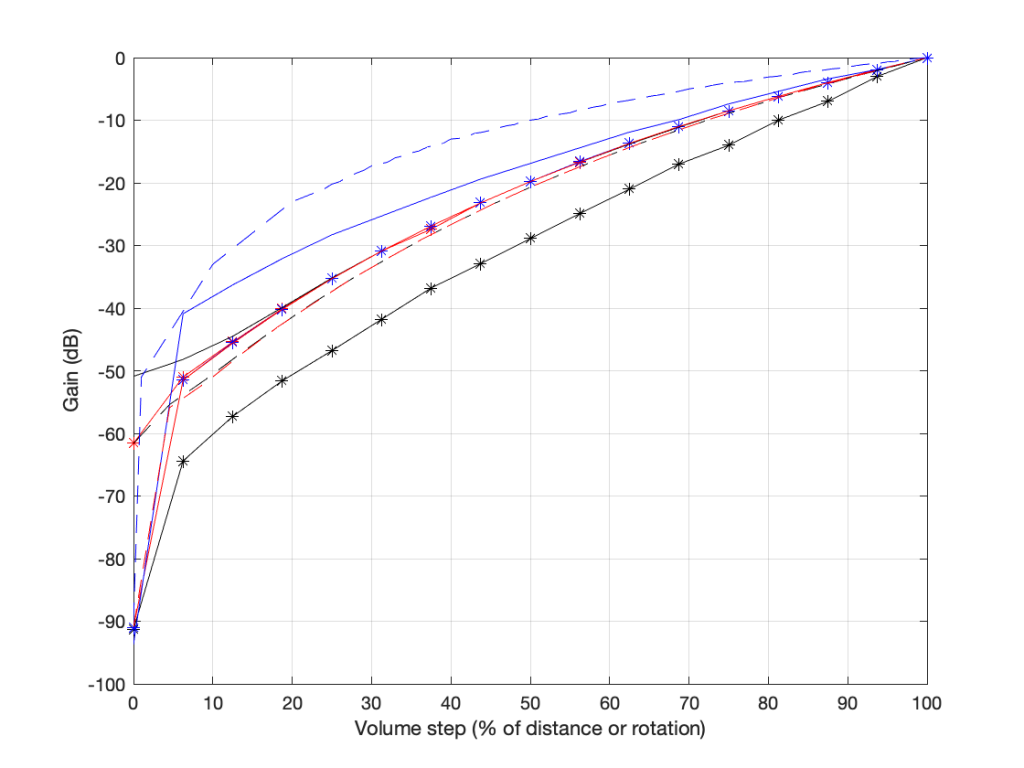
there are two important things to note in the above plot.
- These are the measurements of 8 different devices (or software players or “apps”) and you get 8 different results (although some of them overlap, but this is because those are just different version numbers of the same apps).
- Notice as well that there’s a big difference here. At a volume setting of “50%” there’s a 20 dB difference between the blue dashed line and the black one with the asterisk markings. 20 dB is a LOT.
- None of them look like the straight lines seen in the previous plot, despite the fact that the Y-axis is in decibels. In ALL of these cases, the biggest jumps in level happen at the beginning of the volume control (some are worse than others). This is not only because they’re coming up from a MUTE state – but because they’re designed that way to fool you. How?
Think about using any of these controllers: you turn it 25% of the way up, and it’s already THIS loud! Cool! This speaker has LOTS of power! I’m only at 25%! I’ll definitely buy it! But the truth is, when the slider / knob is at 25% of the way up, you’re already pushing close to the maximum it can deliver.
These are all the equivalent of a car that has high acceleration when starting from 0 km/h, but if you’re doing 100 km/h on the highway, and you push on the accelerator, nothing happens.
First impressions are important…
On the other hand (in support of thee engineers who designed these curves), all of these devices are “one-offs” (meaning that they’re all stand-alone devices) made by companies who make (or expect to be connected to) small loudspeakers. This is part of the reason why the curves look the way they do.
If B&O used those style of gain curves for a Beovision television connected to a pair of Beolab 90s, you’d either
- be listening at very loud levels, even at low volume settings;
- or you wouldn’t be able to turn it up enough for music with high dynamic range.
Some quick conclusions
Hopefully, if you’ve read this far and you’re still awake:
- you will never again use “percent” to describe your volume level
- you will never again expect that the output level can be predicted by the volume setting
- you will never expect two devices of two different brands to output the same level when set to the same volume setting
- you understand why B&O devices have so many volume steps over such a large range.