So, you just bought a subwoofer and it has a bunch of controls on it with some familiar names like “level” or “gain”, some sort-of-familiar ones like “cutoff frequency” and “phase” (or, more correctly “polarity” or maybe a switch that says “invert”), and possibly a really unfamiliar knob that says “phase” or “all pass” that goes from a low number to a high number (maybe).
What do all of these controls do, and how do you adjust them?
Well, let’s start with a simple system. We have one subwoofer, one main loudspeaker (let’s say, the left front one) and a “crossover” that divides the energy in the frequency bands appropriately and correctly (in other words, it splits up the bass and the mid/treble and sends the lower stuff to the sub and the upper stuff to the main loudspeaker). Let’s also start with a situation where the subwoofer and the main loudspeaker are the same distance from you, the listener. They’re both set to the correct gain. Everything else in the system is perfect, and you are outdoors (that way, there are no nasty room acoustics to screw us up).
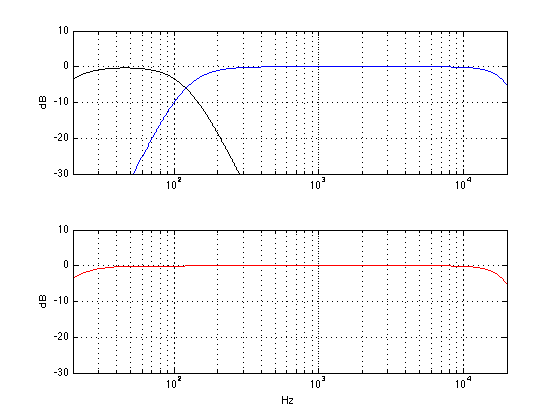
The result of all of this, at the listening position, will be something like the figure below. The black curve shows the output of the subwoofer. (I’ve limited its output to 120 Hz – a typical value – but as you can see, it has lots of output above 120 Hz – it just gets lower and lower in level as you go higher and higher in frequency.) The blue curve shows the output of the main loudspeaker, with a lower limit of 120 Hz. The red curve shows the result of the two of the curves being added together. Note that I have not just added the black and the blue curves. I have actually added the two outputs plotted the result as a frequency response.

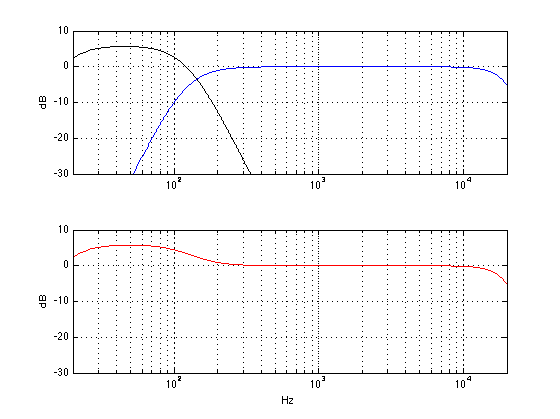
Now, let’s change one little thing. We’ll leave everything untouched except for the GAIN (or LEVEL or VOLUME) knob on the subwoofer. Let’s start by turning that up by 6 dB. This means that you now have twice as much sound pressure from the subwoofer. The result will not come a a surprise. As you can see in the red graph below, you get more bass. In fact, you get 6 dB more bass. So, if you like more bass (and you don’t have neighbours), then this is a good idea.

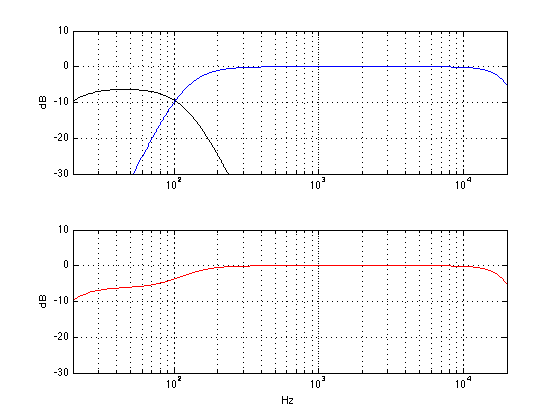
Similarly, we can leave everything untouched except for the GAIN (or LEVEL or VOLUME) knob on the subwoofer and turning it down by 6 dB. This means that you now have half as much sound pressure from the subwoofer. As you can see in the red graph below, you get less bass. In fact, you get 6 dB less bass. So, if you don’t like more bass (or if you have cranky neighbours or sleeping children), then this is a good idea instead.

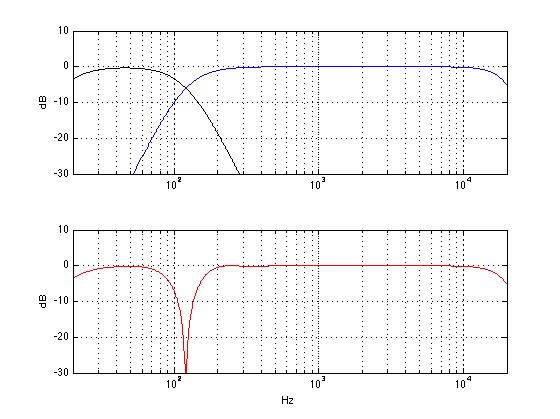
Okay, enough of the easy stuff. Let’s get complicated. Let’s set the gain of the subwoofer back to “correct” and move the subwoofer away a little bit. We’ll start by moving it 1.433 m (that’s about 4′ 8 1/2″ for those of you in the USA…) further away from the listening position than the main loudspeaker (I have chosen this value carefully, but it doesn’t matter how, for the purposes of this discussion…) Now, without fiddling with any of the knobs, what do we get at the listening position? Well, that will look like the figure below.

There are two important things to notice in the plot above. The first thing is that the black and blue curves are identical to the ones in the plot at the top. This means that the individual outputs of the subwoofer and the main loudspeaker have the same frequency content as they did when we started. This should not come as a surprise, since all we did was to move the subwoofer – it should have the same output. The second thing to note is that there is now a big dip in the red curve at 120 Hz. Why is this? Well, it’s because when the two loudspeakers have a difference in distance of 1.433 m, they don’t line up in time. The practical result of this is that, at 120 Hz, both of the loudspeakers “push” air at the same time, and that high pressure in the air starts moving towards you. A little while later, both loudspeakers (which is closer to you) are “pulling” air, making a low pressure in the air. The problem is that, due to the speed of sound being “only” 344 m/s, the amount of time it takes the high pressure to get from the subwoofer to the main loudspeaker (1.433 m away…) is exactly the same amount of time it takes for both speakers to change from “pushing” to “pulling”. So, when the high pressure from the subwoofer passes by the main loudspeaker, the main loudspeaker is creating an equal (but opposite) low pressure. Those two pressures (one high and one low) add together in the air and cancel each other out. As a result, you can think that the output of the main loudspeaker counteracts the output of the subwoofer, and you get less.
The important thing to remember here is that both speakers are working just as hard as they did before – it’s just that you don’t get any output at that one frequency. Note as well that the frequency where the subwoofer and the main loudspeaker cancel each other is dependent on how far apart they are, as we’ll see later.
What does this sound like? Well, you might notice that there are a couple of bass notes (specifically, around the B a little more than an octave below middle C) are much quieter than the other bass notes. Or, you might just experience that you have less bass generally. For those of you who think that “bass” is much lower than 120 Hz, you might experience that the total system loses warmth in the sound (although “warmth” is generally a little above 120 Hz… depending on your tastes…)
So, how do we fix this problem? Well, since we have a problem with high pressures getting cancelled by low pressures, one solution is to “flip” the output of the subwoofer so that it generates a low instead of a high and vice versa. (In other words, we’re telling it to “push” out instead of “pulling” in and vice versa. We can do that by changing the POLARITY or PHASE or Ø switch (those are just different names for the same thing – sort of…) on the subwoofer to NEGATIVE or INVERT. The result of this, at the listening position, is shown below.

As you can see in that plot above, the result isn’t perfect, but it’s a lot better. The deep notch that we had at 120 Hz is gone, and now all we have is a little ripple around the “crossover region” where the outputs of the two loudspeakers overlap.
There are some people who think that there is an audible difference between the sound of a kick drum “pushing” a loudspeaker out (and making a high pressure) and “pulling” a loudspeaker in (and making a low pressure) and, as a result, they don’t like flipping (or inverting) the polarity of a subwoofer. If you’re that kind of person, and if you have a PHASE or ALLPASS knob on your subwoofer, you have an option. An allpass filter is a special filter that does not change the magnitude (or output level) of the signal, but it does change the phase as a function of frequency. What that means (sort of) is that it can add (or subtract) different delays for different frequencies (I know, I know, it’s not a delay – but if you can think of a better way to describe it to neophytes, be my guest). If we use an all pass filter (for the geeks, I’m using a second-order allpass filter) and set its frequency to 120 Hz and apply that to the subwoofer signal, the result is shown in the plot below.
In other words, if you have a problem like this, and you flip the polarity switch and get those missing bass notes back (or the bass in general – or the warmth), then you’ve probably fixed the problem.

As you can see in that plot above, the result still isn’t perfect. In fact, it’s a little worse than the polarity invert solution – but it’s still a lot better than the problem we’re solving. The deep notch that we had at 120 Hz is gone, and now all we have is a little (but slightly bigger) ripple around the “crossover region” where the outputs of the two loudspeakers overlap.
The reason this particular setting of the allpass filter worked is because I had a 2nd order allpass filter, and I set it to 120 Hz. This meant that the phase “delay” of the allpass filter was the same as the phase “delay” caused by the difference in distance. If I had used an allpass filter with a different order (i.e. a 1st order), and/or a different frequency, and/or a different distance, this would not have worked as well (we’ll see that as an example below…).
So, the moral of the story here is that, if you have the problem caused by distance, and you play with the ALLPASS or PHASE knob, and listen to those missing bass notes, just fiddle with the knob until the bass notes are there…
But what happens if the subwoofer is further away than the main loudspeaker but not as far away as we have been looking at above? Let’s place the subwoofer 0.72 m (2′ 4 1/4″) further away than the main loudspeaker and take a look at the result – shown in the red plot below.

Now you can see that we still have a dip at 120 Hz, but it’s not as bad as when the subwoofer was 1.4 m away. This is because the time alignment of the two loudspeakers is better, the closer together they are.
So, how do we solve this problem? Well, let’s start by flipping the POLARITY switch again. The result of that is shown below.

As you can see in the red plot above, flipping the POLARITY or INVERT switch actually makes the problem worse now that the loudspeakers are closer together. We’re losing more “bass” at 120 Hz because we have flipped the switch. So, we’ll need to find a different solution.
Okay, let’s play with the allpass filter again. We’ll set it to 120 Hz like we did before and take a look at the result (shown below).

Hmmmm… that didn’t work. Not only is the allpass (at 120 Hz) worse than the original problem, it’s also worse than flipping the POLARITY switch (in other words, we’ve lost more bass around 120 Hz – since the dip in the red curve is deeper).
Okay, let’s fiddle with that ALLPASS or PHASE knob a little. we’ll start by turning it lower in frequency, the result of which is shown below.

Hey, that worked well! Although our problem is at 120 Hz, we nearly fixed the problem by setting the allpass filter’s frequency to 40 Hz. Again, a different order of allpass, or a different distance between loudspeakers or a different anything else would have resulted in us finding a different frequency. Do not assume that 40 Hz is the magic number.
Just because I like fiddling with knobs, let’s try going the other way. We’ll turn up the allpass frequency to 240 Hz – the result of which is shown below.

Hmmmm.. .that’s not good. We’ve made the problem much worse. Okay – set it back to 40 Hz (for this example…).
The moral of the story
If you go to a lot of websites, you’ll get the advice that, when setting up a subwoofer, you should put the speakers where you want them, and then fiddle with the switches and knobs so that you get the most bass. This is only partly true. As you can see above, we’re really talking about a frequency band around the “crossover region” where the signals are coming from both the subwoofer and the main loudspeakers.
In a perfect world, the subwoofer has characteristics that perfectly match the main loudspeakers, and you’ve put all of them the same distance from the listening position. This is rarely true. So, you’ll have to fiddle with something to clean up the resulting mess. However, if you just listen for “bass” you might be distracted away from where the real problem lies. Instead, set up your system and listen to the bass line (i.e. the notes played by the instrument called the bass – I don’t care if it’s electric or acoustic. If you prefer ‘celli, you can use them instead). If you notice that some notes are much quieter, you have a problem that you might be able to fix by fiddling with the subwoofer’s controls. Take them one at a time, and listen to those notes that you lost before. If you get them back, you’ve fixed the problem. If you fiddle with every knob, and you can’t get those notes, you might need to blame the musicians or the recording engineer… In fact, it will have to be their fault, because if it’s not, it might be your room, and fixing that is expensive.
Torben Rasmussen says:
Old topic but still relevant none the less. I am running my BL18 off a Sonos analogue output and would like to add a BL19 to the setup. One way to get the crossover set right would be to add a Wireless 1, but my speakers are only 4 meters apart and running an RCA cable is pretty seamless. So do you have the specifics on what the intended crossover for the BL19 should be set at when adding it to a pair of BL18 (assuming they line up at the same distance to the listener etc.)?
geoff says:
Hi Torben
It’s impossible to answer your question directly, without knowing something about your room and the placement of the loudspeakers in it.
However, I would suggest that you:
– play a track that you know well, and that has bass content
– sit in your listening position
– have a friend turn the LPF frequency all the way down, and then slowly turn it up until you notice that you’re either losing bass (because the 18’s and the 19 are cancelling each other) or it’s getting “tubby” or “boomy” (because they’re combining too well…). Back down a little in frequency until that issue goes away, and you have a good start.
Hope this helps!
Cheers
-geoff